
Nothing stops your jamming in its tracks than a nut that has come loose. Nuts can loosen for a variety of reasons- the glue could have dried out, in transit the neck and strings could have shifted pulling the nut off, or a whole host of other reasons.
While gluing a nut is very easy, care must be taken as this small piece is one of the most essential pieces of your instrument. Here’s our step-by-step guide to re-gluing a nut. A simple and easy-to-learn, but often neglected skill.
How To Re-Glue Guitar Nut, Step 1: loosening the strings
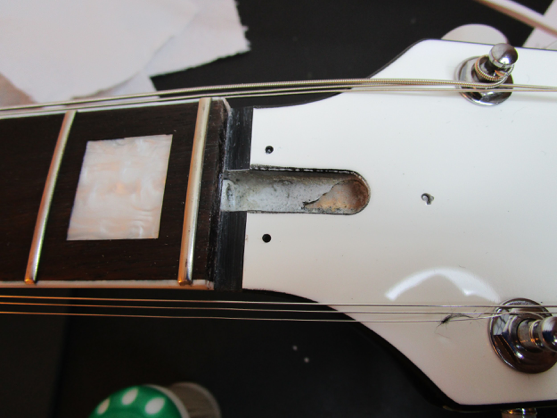
The first thing to do is loosen the strings slightly and see if the nut is completely unglued. If it is not unglued you must take care to remove it. To remove a nut that is still attached, remove the strings and hold a block of wood against the nut from the fretboard side. Tap the wood very gently with a hammer. This applies even pressure against the nut and prevents it from chipping. If there is finish around the nut, score around the nut with a sharp blade, which will minimize chipping the surrounding finish.
How To Re-Glue Guitar Nut, Step 2: examine the slot
Once the nut is free, examine the slot- in most cases, the glue joint broke from hard movement of the case- the movement of the guitar in the case and the tension of the strings will shear the nut at the glue joint. Since very little glue is used (on purpose) the slot should only have a tiny bit of glue residue. If you have large hunks of glue in the slot, you should very gently chip these away with a small tool like a dental pick. You absolutely do not want to gouge away any wood in the slot- its levelness and straightness are important for the nut to seat back properly and the guitar to play well again.
How To Re-Glue Guitar Nut, Step 3: examine the nut
Now examine the nut- it should ideally only have just a minor amount of glue residue. Again, if there are large pieces of glue, you can remove them carefully, again making sure that you do not chip or crack the nut. I find it helpful to gently use a metal ruler to scrape away any glue, but not remove any material from the nut. These steps are important, as the two surfaces must be clean to ensure a good, strong glue joint.
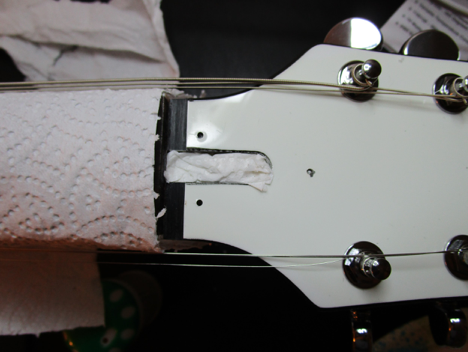
How To Re-Glue Guitar Nut, Step 4: protect the guitar
Once you are sure both gluing surfaces are clean, the most important step is next, protecting the guitar before gluing the nut back on. Some use drafting tape, which is extremely low tack, and won’t damage finishes. I think that this is not needed when gluing at nut, so I just place a paper towel over the peg-head and fingerboard, under the slackened strings. This will make sure you don’t have any unfortunate drips. Also- VERY IMPORTANT- place paper in the truss-rod cavity, completely covering it. Glue and your truss-rod should never meet.
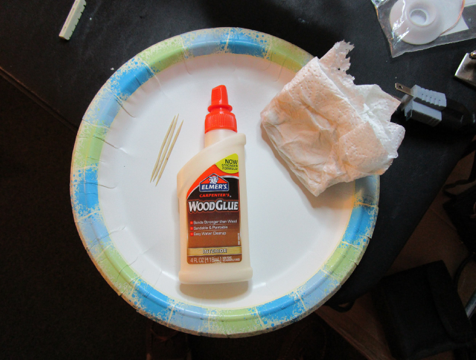
How To Re-Glue Guitar Nut, Step 5: grab your supplies
Now it’s time to grab your supplies: a paper plate, glue, a damp rag, and toothpicks. These are really the only tools you’ll need. For glue, a non-super glue that is water soluble is the best thing to use. Even white glue from your elementary school days is fine. The pressure of the strings keeps the nut down, the glue keep it from moving side-to-side. Also remember- nuts are made to be replaced, as they wear down over time. Using too strong a glue will make replacement difficult and potentially harmful to the instrument. I use a simple wood glue, easy to get, and handy to have around the house. Water soluble is also important, as you can use warm water to clean any of the glue from finish, and also use warm water to break the glue joint if necessary.
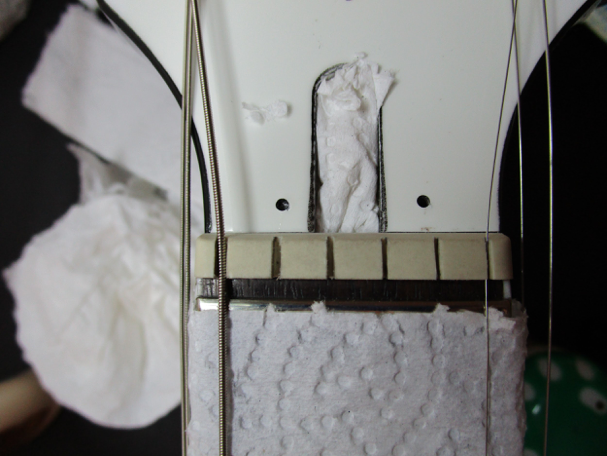
How To Re-Glue Guitar Nut, Step 6: set up space & dry-runs
Now the next step is to set up your space and do several dry-runs. Make sure the path from the glue to the nut slot is covered and that if there are drips it will not be a problem. Optimize your path of travel, as every second the glue will be hardening. Once you are happy with your arrangement, pour some glue out of the bottle on to the plate. I pour out more than I need, so that I can choose the small amount I need. Really, the only glue you will need will be a dab on the end of the toothpick for each end of the nut. I put a dab in the middle of the slot, in between the end of the slot and the truss-rod channel. Now place the nut in the slut and gently move it from side to side- this will spread the glue evenly. Now place the “E” strings in the slot and tighten them just a bit- be careful to not over tighten, as the low “E” will pull the nut off center, just even the tension with the high “E”. Now quickly check the fit- I look at the pickup pole pieces to see my alignment, as well as the edge spacing on the overall fretboard. Once you are happy with the position, put the string back in the slots and give them a few turns, making sure they don’t shift the nut.
How To Re-Glue Guitar Nut, Step 7: …and you’re done!
Now take the damp rag and look for any glue squeeze-out, it will be much easier to remove at this point. Let the re-glued nut dry for several hours, ideally overnight. Once the glue is dry, tune to pitch, and you are good to play again! If you found the nut moved and dried off center, repeat the steps and try again.
This is an easy repair that can really be done anywhere, most likely with things you have around the house. Having the right glue is most important, and doing a few preparatory dry-runs will make this easy and worry free.
“Now place the nut in the slut and gently move it from side to side”
OK. If you want me to.
Now place the nut in the slut and gently move it from side to side- this will spread the glue evenly.
Best typo ever
Great article. Does the glue-type matter if using a plastic nut? Since the glue only keeps the nut from moving side-to-side it should not matter.