
Guitars are funny. Six strings, a piece of wood, and a rather simple electronic circuit is all they’re made of. They’re all the same thing! Why does one cost $200 dollars, and the next is $2000? While many would jump to “brand name” as their go-to answer, you have to consider how the big brand names got there in the first place. The real answer is two things in my opinion, the first being the quality of the components used, and the second would be attention to detail. For example, Pablo Picasso could take a pencil and piece of paper and create a priceless masterpiece that would be cherished for years. I could take those same materials and make some decent kindling. Same components, but a much different end result!

No matter the price of the guitar, the fact is that they all operate the same way and all need to be maintained the same way. Recently, I began an article series called “Vincent’s Tips on Tones” (check it out if you haven’t!). In the first issue, I mentioned that a proper guitar setup can have a large impact on your playing, and ultimately your overall tone. In this series, I’ll go further into detail about setting up your instrument and fixing issues that prevent you from playing to your full potential.
For starters, a little about myself:
My name is Vince and I’ve been working as a guitar technician at Eastwood Guitars for the past three years. It is my job to inspect, set up, repair, and prepare the instruments for shipment to their final destination. For the first few entries, I’ll go over the essentials of a basic guitar setup assuming there are no major problems with the instrument.
The first thing you want to do is look over the entire guitar for any blemishes, and make sure the electronics are functioning properly. There’s nothing worse than doing a full set-up only to notice a problem that’s going to require more work. If you’re working on a heavily used guitar, it’s still good practice to familiarize yourself with any damage on the guitar before you work on it. That way, you won’t notice it afterwards and think “uh-oh, did I do that?”
If the guitar looks clean and is working, you can begin the setup. The first thing you need to understand is that whatever adjustment you make will have an impact somewhere else on the instrument. For example, flattening out the neck will both lower your strings and alter your tuning and intonation. For this reason, it’s important to inspect each piece in order, and make the adjustment where necessary. Often times you will need to go back and readjust changes you’ve made so everything will balance! Today I’ll focus on:
Neck Relief.
Generally speaking, you want your guitar neck to be as straight as possible. A neck that is too far “back bowed” can cause significant fret buzz problems and dead notes, while one that is too far “over bowed” can cause your action to be impossibly high and throw off intonation.
With a keen eye, you can visually check for this by holding the guitar by its body, and looking down the side of the neck from the nut to where the neck meets the body. Be sure not to push on the neck when doing this as you could influence the bow in the neck. What you’re looking for is a bow in the neck. A neck that dips down like a valley is referred to as being over bowed. One that dips upward like a hill is known as being back bowed.

If I’m working on my own guitar or I know what the owner likes, sighting the guitar in this way is enough to know what kind of adjustment I need to make to be happy with it. If it’s for an unknown customer, I prefer to use a measurement method that will turn out the same way each time.
Using a capo, clamp down the strings in the first fret. Then, push down on the low “E” string at the 17th fret. Now, look at the 8th fret. There should be just a sliver of space between the bottom of the low “E” and the top of the fret. If you have one, slide a .010 feeler gauge underneath the string. If it just sneaks under, you’re golden.
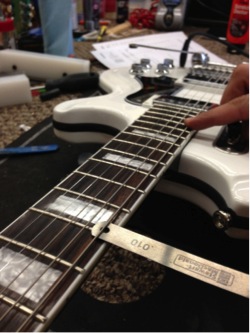
If there’s a large gap between the feeler gauge and the string, it means your neck is over bowed and you’ll need to tighten your truss rod. If the gauge pushes against the string too much or doesn’t fit underneath, your neck is back bowed and you’ll need to loosen the truss rod.
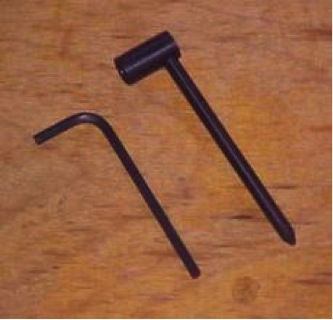
Once you’ve determined the state of the neck, you can try an adjustment if necessary. First you’ll need to find the truss rod access, which is typically located where the headstock meets the neck just above the nut. You will need the right sized Allen key or truss rod wrench to make the adjustment (your guitar should have come with this when you bought it). If the key does not fit perfectly snug, do NOT turn it! The last thing you want to do is strip your truss rod!
Once you’ve found a wrench that fits in tight, start by making a small turn counter-clockwise to loosen the rod. You never want to tighten first incase the rod is maxed out. Once you’ve learned that the rod will spin, you can start to make small adjustments whichever direction required to straighten the neck. Counter-clockwise will loosen the rod, while clockwise till tighten. Remember to sight the neck after each turn to see what’s happening with the neck.
When you think you’re happy with how straight the neck looks, you can check the relief again with the capo method, followed by a play test! Many times a simple neck adjustment is all a guitar will need to play smoothly. However, if during your play test there are still problems with the guitar, the issue lies somewhere else – but we’ll get to that in a later “Guitar Workshop”! Next time, I’ll talk about the two things I follow up every neck adjustment with; String height, and intonation!
Happy playing!
any one who can help me with the wiring diagram for Kawai S 180 FOUR PICKUP WITH FOUR SWITCHES GUITAR please mail me if you have any information Will be much appriciated
I’m having an issue with only fret buzz occurring at the twelfth fret on my low E string. All of the others seem to be working fine. What can I do to eliminate this issue. Could I adjust the saddle height to fix this? The neck looks perfectly straight, so I’m wondering if it is only a bridge issue, and not the truss rod. The guitar is an Eastwood RD Artist, and the other two i possess seem to be still working well. Knowing you’re the best to consult, I thought to contact you first!
Thank you for all you do at Eastwood, and look forward to your response..
Sincerely, IRA Freed
Guitarghost