
I remember feeling a certain terror as a young boy plugging my guitar in to play, but not hearing anything come from the amp when I strummed a chord. Frantically I’d check my volume knobs, the volume on the amp, and jiggle the cable around to no avail. “I’m doomed”, I would think. “There’s no way I would try to open that thing up myself, I don’t want to break it even more than it already is!”
When an electrical device fails, and its functions are a mystery to you, it’s normal to feel a little helpless. The first thought is to take it in for repair, which is your best (and most cost effective) bet if you’re someone who just wants to play. However, for those “do-it-yourselfers” or any interested in learning to work on guitars, this is a beginner’s guide to the minor electrical repair of a guitar.
The first step is to identify what the problem is. Is there no output at all? Does the guitar cut in / out when the cable is jiggled? Do you have output from only one pickup? Do you hear a dirty crackling noise when you rotate the volume/tone knob? Is there a constant loud hum that comes from the amp when you plug the guitar in? These are all common problems that can occur, and are usually very simple soldering fixes. In order to get started, here’s a list of what you will need:
1) Soldering Iron (not too powerful, 30 watts will do. You don’t want to fry your components!)
2) Solder
3) Wet Sponge (wet paper towel will do)
4) Screw driver set
5) Needle nose pliers
6) Wire cutters/strippers
7) Electrical contact cleaner
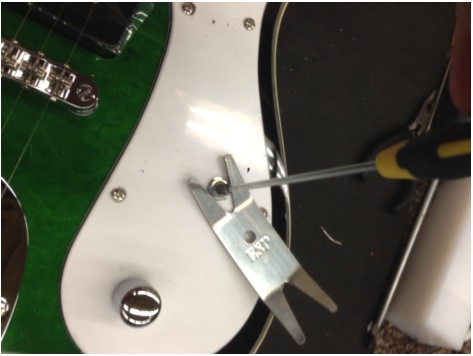
Before opening the guitar up, check that the knobs and the input jack are tight. A loose bolt can signal the reason for the problem – if the bolt is loose and a knob is turned, the whole pot will spin. This can eventually lead to wires being disconnected. In order to properly tighten a bolt, hold the top still with a flat head screwdriver, and then tighten with your pliers like so:
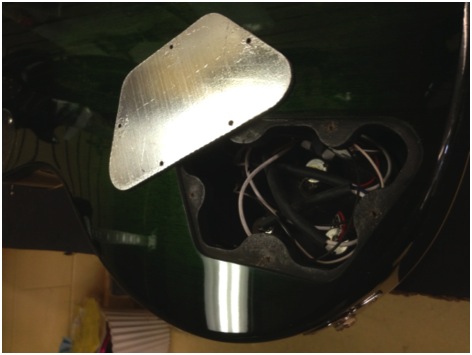
Now it’s time to open up the guitar! Different models will have different access spots. Most often, a guitar’s electronics will either be mounted to the pick guard on the front of the body, or will be accessible through a panel on the back like this one:
Sometimes, neither of these are available which leads to a tricky process of feeding the components through the pickup cavities, the input jack cavity, or even through one of the thin “F-holes” on a semi-acoustic. Most people call them F-holes because of their shape, but when you are trying to feed a large volume pot tied to a string through it without damaging the pot or the guitar, the name will have a new meaning. More on that later.
Here, I’ve opened up an Eastwood Sidejack which has the electronics mounted to the pick guard:
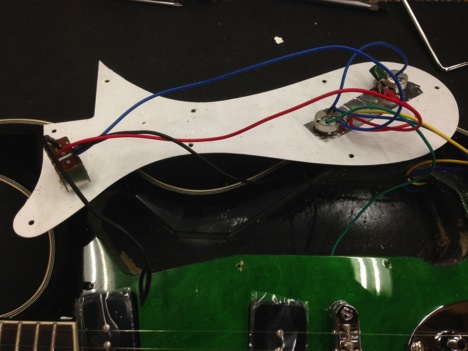
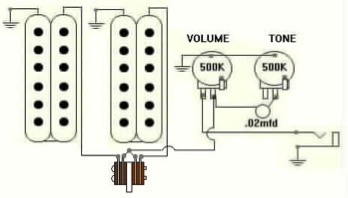
The first thing you’ll see is that there really isn’t much to it. At least, not for a 2 pickup guitar with basic volume and tone controls. At this point, it’s time to remember what the issue was. If it was just a dirty crackling sound, you may only need to spray some contact cleaner into the problematic component. Find the small hole in the pot, and spray some in. Rotate the pot back and forth until the noise goes away. If this doesn’t seem to help the problem after a few attempts, the pot may need to be replaced. Was there no output at all? Check the connection of the wires at the input jack, and make sure the metal piece that the cable make contact with is properly bent to do so. Check that the “hot” wire (usually red) is connected to the volume pot properly. If you see a wire that’s completely disconnected, well that’s a dead giveaway. How do you know where to connect it if you aren’t experienced? Look for a lump of solder somewhere that doesn’t have a wire attached to it, and just place the wire up to it. Check to see if that fixes the problem. Alternatively, many guitar manufacturers offer wiring diagrams that you can follow and match exactly.
What if all the wires seem to be connected, but the problem is still there? Hopefully, this is just what’s known as a “cold solder joint”, meaning something is not fully connected with solder. With your hand, gently jiggle each wire around at its connection. When you find one that makes the guitar cut in and out as you move it around, you’ve found the cold solder joint!
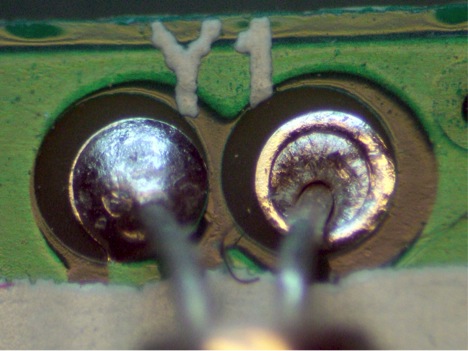
(not in a guitar, but shows a good solder joint vs a cold one on the right)
A guitar that is making a constant, loud hum noise could be a grounding issue. Check that the grounding wires are all properly connected. These are normally the wires that have a large portion of their wrapping stripped, and are soldered to the tops of the pots. Follow along the grounding wires to see where they attach to – you will notice each component connects with each other somewhere, and then one wire goes through the body of the guitar to attach to either a bridge post or a tailpiece screw.
When you’ve found the wire that needs to be re-soldered, you can get your soldering iron ready. When it’s hot, you’ll need to “tin the tip”, which just means to melt some solder on to the tip of the rod, and then wipe it on the wet sponge. The fresh solder on the tip allows for better solder and heat flow. If the wire is still somewhat attached, you can use the iron to melt the solder holding it and detach it completely. Often a wire may need to be prepared to be re-attached, such as this one:
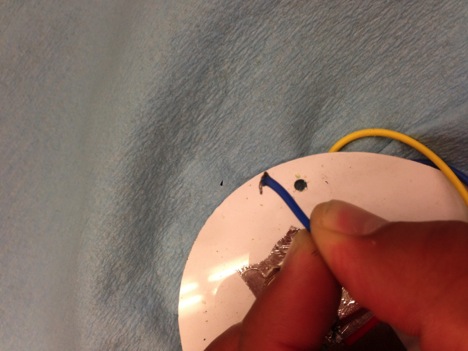
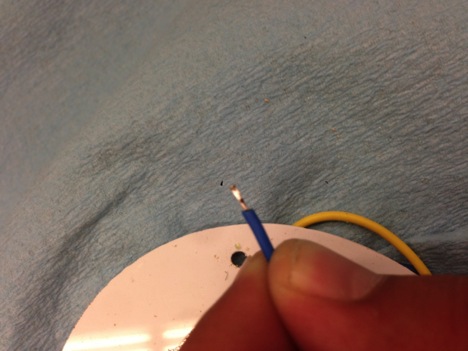
Here I cut off the “bad” end, re-stripped the wire, and then coated it in solder to make re-attachment easier:
The tabs on the pots have small holes in them, and the best connection you can make is when the wire sits in this hole. To do this, make sure the hole is filled with solder. Then, heat up this solder with your iron and thread the wire end through. Make sure the solder fully connects the wire and the pot tab, and there are no holes between them. This is exactly what a cold solder joint looks like, and you don’t want that! If it looks good, let it cool, and you’re done!
When I fixed my first electrical problem on a guitar, all fears I had of making things worse went away. It really isn’t too daunting of a task; as a matter of fact, it’s kind of fun doing the troubleshooting and figuring out the problem. Hopefully you’ll feel the same when you fix yours!
Happy Playing!
Really helpful.
I found that the only guitar i have (For the moment), its input jack is desoldered, and even though i don’t have a soldering iron, i know a friend who has one.
And that’s the importance of doing “Vivisections” to my guitars, so i can see how they work and for fixing problems that may come.
BTW, i’m 14.