
If you’ve been following along with my articles, you’ll know that I’m not such a big fan of fret buzz. Then again, who is? Last time, I talked about how to deal with minor fret issues that could cause buzz from one or two frets. Unfortunately, it’s sometimes necessary to have to do an entire fret level to get your guitar playing properly and today I’ll go over the first steps for this procedure.
The absolute first step before you do any kind of fret leveling is to ensure that the neck is as straight as possible. I explained a good technique for doing so in my “Worksop Issue 5”, so you may refer there before reading on if you like.
There are some contraptions available to help keep a neck straight, or apply force to simulate string tension while you work (such as the Erlewine Jig), but said contraptions are relatively pricey and to explain how to use them would fill up an article on its own! For now, we’ll go without.
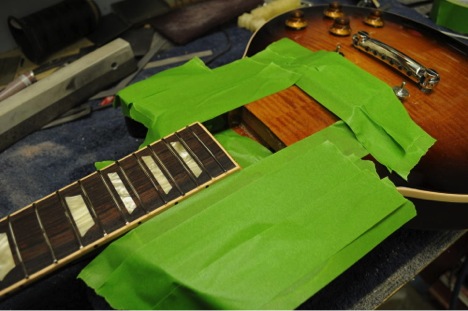
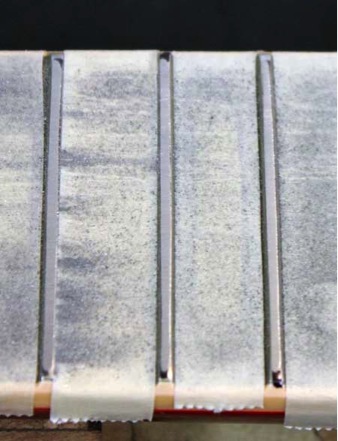
With a straight neck and the strings off, you can begin to map out the bad frets. Using a fret rocker or straight edge, test each fret in the same way I explained in Issue 5. This time, however, you need a way to remember where the problem areas are. With a sharpie, mark along each fret where the rocker… rocked. If you’re nervous about slipping with the marker, you can tape off the entire neck as seen in this picture:
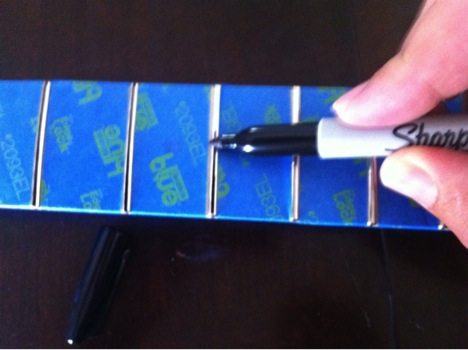
When it comes time to filing, you can use these markings to indicate where you need to pay more attention. Keep in mind the person in this picture is likely making markings for crowning the frets – only mark the fret in the area it’s actually high in.
Once the markings are done, you can get ready to start filing! Again, as a precaution and to save from cleaning up metal “dust” afterwards, you can tape off the neck. It’s also a good idea to lower the neck pickup if you feel you may slip and hit it, and taping off the whole top section of the body will prevent fret filings from flying into the pickup cavities or onto the guitar.
There are a couple different tools you can use to file the frets, my favourite being:
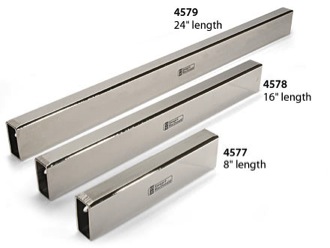
These fret level bars from Stewmac. I use the 16” and the 8” as the 24” tends to be too long for the instruments I’m working on. The idea is to wrap sandpaper around the beam, and slide it back and forth on the frets to make them level with each other. The weight of the beam should be enough force on the frets, so you shouldn’t have to push down very much. I like to use a 220 grit paper, but there are many who start with a lower grit and change to a higher grit as they progress. This helps make any file marks in the frets get smaller and smaller, eventually resulting in a smoother fret. Personally I prefer to do this step afterwards while I’m crowning each fret, so I find sticking to a 220 grit works just fine.
Like I mentioned before, the markings you made are reference points while you file. Make sure you hit those points in particular with the file and essentially get rid of those markings. You can also look and see the filings coming off each fret – there will be more buildup beside the high frets of course.
While you want to make sure your frets are level, don’t overdo it! A fret only so high, and the more you file, the closer you get to needs a re-fret job. The fewer strokes it takes you to get the frets level, the better. With that in mind, it’s a good idea every few strokes to go over with the fret rocker and check those problem areas.
When you’re confident with the height of the frets, you’re done! It’s time to move on to crowning and polishing. That’ll be next time on Vincent’s Workshop. For now…
Happy playing!
I do fret work for a local store. I like to think I’m not a “hack” but I’m still learning. I spent allot of time reading Stew/Mack’s books, watching videos and giving them insane amounts of money for tools. Everything you’ve said in this article is good, but I wish you had added the step of checking for loose frets. Frets can be so sneaky! After the initial straightening, I rock the frets starting at the body and working back toward the headstock. I sharpie all the high frets, then look damn close at them for loose ends. I’ve seen several guitars with incompletely set frets that are high in the middle. Sometimes, as you know, temperature changes can cause frets to unseat and raise up. At this point I put the neck on a sand bag support and lighly tap the marked areas down (then I put a bead of super glue along the fret to lock it in place. NOW I’m ready for elbo work! I know you have a limit to how much detail you can put in one article, but without this step you can have big problems later on.
Can’t find Vincent’s Guitar Workshop – Issue 5. Please post.
Hmmm… we seem to have gone from Issue#4 straight to Issue #6.
What happen to Issue #5, the volume used as a source of reference in #6?
Maybe I missed it, but I can’t fine Vince’s Issue #5. I can haz linkie?
I also am looking for Workshop 5…is there a link? Does it exist? Please help!